ႀကိဳတင္ျပင္ဆင္ျခင္း
1. Samsung Galaxy Tab 3 8.0 အတြက္ USB Driver တင္ၿပီးသားျဖစ္ရပါမယ္။
2. USB Debugging On ၿပီးသားျဖစ္ရပါမယ္..
3. Data ေတြကို Backup လုပ္ထားသင့္ပါတယ္။
4. ဒီနည္းက Samsung Galaxy Tab 3 8.0 အတြက္သာျဖစ္တဲ့အတြက္ Samsung Galaxy Tab 3 8.0 ျဖစ္မွသာ လုပ္ေဆာင္ပါ..
လိုအပ္ေသာ ဖိုင္မ်ားရယူျခင္း
ေအာက္ကဖိုင္ (၂) ကိုေဒါင္းပါ. Odin 3.09 ရွိရင္ ေဒါင္းဖို႔မလိုပါဘူး..
1. CF-Auto-Root for SM-T310 (Wi-Fi), SM-T311 (3G), SM-T312, SM-T315 (LTE), SM-T315T
2. Odin 3.09
Root လုပ္နည္း
***********
1. ေဒါင္းလို႔ရလာတဲ့ CF-Auto Root နဲ႔ Odin ဖိုင္ေတြကို ျဖည္ထုတ္ပါ.
2. Odin ကို Run ပါ...
3. ဖုန္းကို Power ပိတ္ပါ.. Download Mode ဝင္ပါမယ္.. ဖုန္းရဲ႕ Voluem Down ခလုတ္နဲ႔ Power ခလုတ္ကို တြဲႏွိပ္ထားေပးပါ.. Logo တက္လာရင္ ခလုတ္ေတြကို လႊတ္ၿပီး Volume Up ကိုဖိထားလိုက္ပါ.. စက္ရုပ္ Logo နဲ႔ Download mode ကိုေရာက္ပါမယ္.. ( ေနာက္တစ္နည္းက ဖုန္းကို ဂ်စ္ ဆိုတဲ့ပစၥည္းေလး ထိုးလိုက္ပါ )
4. Download Mode နဲ႔ USB ႀကိဳးသံုးၿပီးကြန္ပ်ဴတာမွာ ခ်ိတ္လိုက္ပါ။
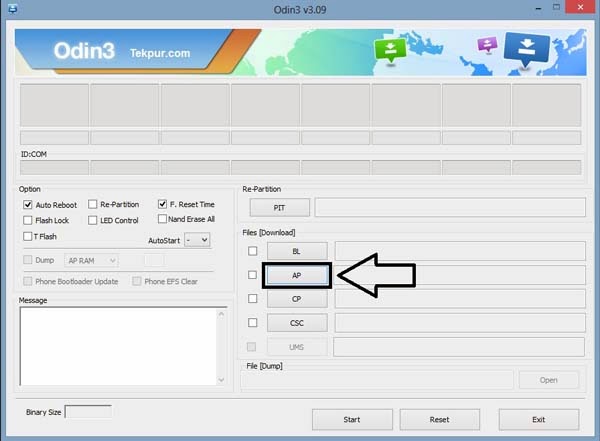
5. Odin မွာ အျပာလဲ့လဲ့ေလး သန္းလာရင္ ဖုန္းကို Odin ကသိၿပီ... ဒီေတာ့ Odin ထဲက Ap ကိုႏွိပ္ၿပီး CF-Auto-Root .tar.md5 ကိုေရြးပါ.. Option ေအာက္နားက Re-Partition မွာ အမွန္ျခစ္ရွိေနရင္ျဖဳတ္ပစ္လိုက္ပါ..
6. Odin ထဲက Start ကိုႏွိပ္ပါ... အလုပ္လုပ္ေနတာကို ျမင္ေတြ႕မွာျဖစ္ၿပီး ဖုန္းက Reboot က်သြားကာ ျပန္တက္လာပါလိမ့္မယ္.. Odin ရဲ႕ ဘယ္ဘက္အေပၚေထာင့္နားေလးမွာ Pass ဆိုၿပီး အစိမ္းေရာင္ျပသြားရင္ လုပ္ငန္းစဥ္ ၿပီးဆံုးပါၿပီ.. ဖုန္းမွာ SuperSu ေလးနဲ႔ root ေပါက္ေနပါၿပီ...

Pre-requisites
1. Install USB Drivers for Samsung Galaxy Tab 3 8.0 on the computer.
2. Enable USB Debugging Mode on the tablet by navigating to Settings >> Developer Options.
3. Make a backup of all your important data before following the guide.
4. Ensure the battery of the tablet is charged more than 80 percent.
5. The CF-Auto-Root files works only on the Galaxy Tab 3 8.0. Applying these to any incorrect variant might brick the device. Verify the model number of the Galaxy Tab 3 8.0 by navigating to Settings >> About Phone.
Files Required
Download Following to files :
1. CF-Auto-Root for SM-T310 (Wi-Fi), SM-T311 (3G), SM-T312, SM-T315 (LTE), SM-T315T
2. Odin 3.09
Steps to Root Galaxy Tab 3 8.0
Step 1: Extract the CF-Auto-Root and Odin 3.09 files .
Step 2: Switch off the Galaxy Tab 3 8.0. Then boot into Download Mode by pressing and holding Volume Down, Home and Power buttons together until a construction Android robot icon with a warning triangle appears on screen. Now press the Volume Up button to enter Download Mode.
Step 3: Launch Odin on the computer as an Administrator.
Step 4: Connect the Galaxy Tab 3 8.0 to the computer using USB cable while it is in the Download Mode. Wait until Odin detects the device. When the device is connected successfully, the ID: COM box will turn to light blue with the COM port number. Additionally, the successful connected will be indicated by a message saying Added.
Step 5: In Odin, click the AP button and select the CF-Auto-Root .tar.md5 file.
Step 6: Make sure that the Re-Partition checkbox is NOT selected in Odin.
Step 7: Double-check and click Start button in Odin. The installation process will now begin.
Step 8: Once the installation process completes, your tablet will restart and soon you will see a PASS message with green background in the left-most box at the very top of the Odin. You can now unplug the USB cable to disconnect it from the computer.
အဆင္ေျပပါေစ..
REF : ေမာင္ေပါက္< Knowledge Note >
www.maungpauk.org


Post a Comment